Download Thumb Drive Folders to New Mac Osx
Migrating to a new computer
How to migrate to a new Mac
All your files, apps, and settings are on your one-time computer. Here's how to movement them to your new Macintosh, from either macOS or Windows.
![]() By
By
Executive Editor for Global Content, Computerworld |

Old Mac, new Mac. It'southward great to get a new figurer, but information technology'south not and then not bad to realize that all your stuff is on the old i.
At that place are several ways to transfer your former computer's files, apps, and settings to your new Mac. The best and easiest style is to use a deject storage service as the waystation. Cloud storage works whether you are moving from i Mac to another or from a Windows PC to a Mac. Our article "The best mode to transfer files to a new Windows PC or Mac" explains the ins and outs of migrating to a new computer via the cloud.
However, yous may not exist able to use the cloud to transfer your files — for case, if the data-usage costs would be also high or you are not connected to the internet, or if your IT department won't permit yous install the cloud account on both the sometime computer and the new Mac.
And you might desire to transfer more than just files from your sometime reckoner to your new one. This story includes methods for migrating files and apps; ii methods tin transfer arrangement settings as well.
Transferring files locally to a new Mac
There are several methods to transfer files locally from an sometime computer to a new Mac, and most work whether yous're moving from a Mac to a Mac or from a Windows PC to a Mac.
Direct file transfer via an external drive or file sharing
You can connect an external hard drive, SD bill of fare, or pollex drive to your erstwhile figurer, re-create your files to it, then eject that device from the former figurer, plug it into the new Mac, and copy the files to that new Mac. The trick here (besides having enough storage capacity on your transfer drive) is to accept your files and folders organized well plenty so you get them all.
Tip: If you lot are transferring files from a PC to a Mac, the external difficult drive must be formatted equally MS-DOS or NTFS, not APFS. SD cards and thumb drives use the same FAT32 format on both macOS and Windows, so if your files fit on those storage devices, that's oft easier than using a difficult drive.
If you're peculiarly savvy, you can transfer files from i Mac to another on the same network using file sharing instead of an external drive. First, enable file sharing on the source Mac: click the Apple menu at the acme left of the screen, cull System Preferences > Sharing and bank check the File Sharing box. Next, connect the new Mac to the source Mac over the network: with a Finder window active on the new Mac, go to the Finder menu at the tiptop of your screen and choose Get > Network, then select the source Mac to mount it as a network drive so you lot can work with it. You tin then open up that network drive in Finder and re-create folders and files from it as y'all would from any bulldoze, although you may need to enter a username and password to access the shared Mac'due south drives.
You lot can fifty-fifty transfer from Windows PCs this mode, since macOS supports the Windows SMB file-sharing protocol, merely the setup can exist a fleck catchy on the Windows end. Apple has provided bones information for Windows-to-Mac networked file sharing.
Whether y'all're transferring files via an external drive or over a network, I recommend that you use the same binder organisation on your new Mac equally on your quondam computer, at to the lowest degree to start. Once your migration is complete, you should consider storing your files on the deject for easier access, equally the article"The best way to transfer files to a new Windows PC or Mac" explains.
Note: Digitally rights-managed files like purchased music commonly won't work one time copied. The best way to transfer these is to re-download them from the service where y'all bought them. Such re-downloads are typically gratuitous.
Direct file transfer will not move your locally stored email files to the new Mac. MacOS stores these files in fairly arcane places, and copying them to a new Mac often doesn't work because of how they are tied to the e-mail application'southward OS settings. I recommend you lot make certain all your emails are stored in your email server (that is in, in your electronic mail client make certain all your emails reside in folders stored on the server), so they can but sync to the email client on your new Mac. The Apple Mail and Microsoft Outlook clients back up several servers, not just Microsoft'due south Substitution and Microsoft 365/Role 365 typically used in business.
Note: Information technology retentivity policies may limit how far back emails are stored on the server, then y'all may take local emails you can't transfer that way. In that case, Microsoft Outlook does let you lot import the local PST files to a Mac from the Outlook app on another Mac or Windows PC; Microsoft has provided the consign instructions for Windows, and here are the split up Mac consign and import instructions.
Local contacts and calendar entries likewise are very difficult to directly transfer from 1 figurer to another, and it is best to brand sure they are stored on a server, such as Exchange, Microsoft 365/Office 365, G Suite/Google Workspace/Gmail/Google Agenda, or iCloud, then they will sync to your contacts and calendar apps on your new Mac. Your contacts and agenda apps may have an export feature that you tin can try. (You can frequently export individual contacts as a VCF file, for example.) These days, few contacts and calendar apps are not server-based, so chances are very loftier your contacts and agenda entries are stored somewhere they can be synced from into Outlook or into Apple Contacts and Calendar.
Transfer via Migration Assistant
MacOS has long had the Migration Assistant file-transfer utility, which lets you transfer selected folders (and their files), applications, and settings from i Mac to another, as well as from a Windows PC to a Mac. It's the all-time pick for moving content from an old Mac to a new IT-managed one, since it won't touch IT's setup of macOS, administrator accounts, and corporate applications.
Migration Banana tin can be run at any fourth dimension; it resides in the Mac'south Utilities folder within the Applications folder. When you first gear up upwardly a new Mac, you also go the pick to run Migration Assistant during that initial setup.
Migration Assistant needs something to transfer from; that something can be a Mac, a PC running Windows seven or later, or a Fourth dimension Machine fill-in drive. The source computer tin can be connected to the same network (via wired Ethernet or Wi-Fi) as the new Mac, or via a straight Ethernet connection between the erstwhile and new computers. A Time Automobile backup drive must be straight connected to your new Mac or over the network if an Apple Drome Time Capsule device is used for the backup.
If you desire to transfer files from a Windows PC to a new Mac, you lot too demand to install and run the Migration Banana for Windows software on the PC; the required version of that software depends on which version of macOS you have. Note: Be sure to uninstall OneDrive on your Windows PC before migrating the PC to a Mac; you tin can reinstall OneDrive on that PC when done.
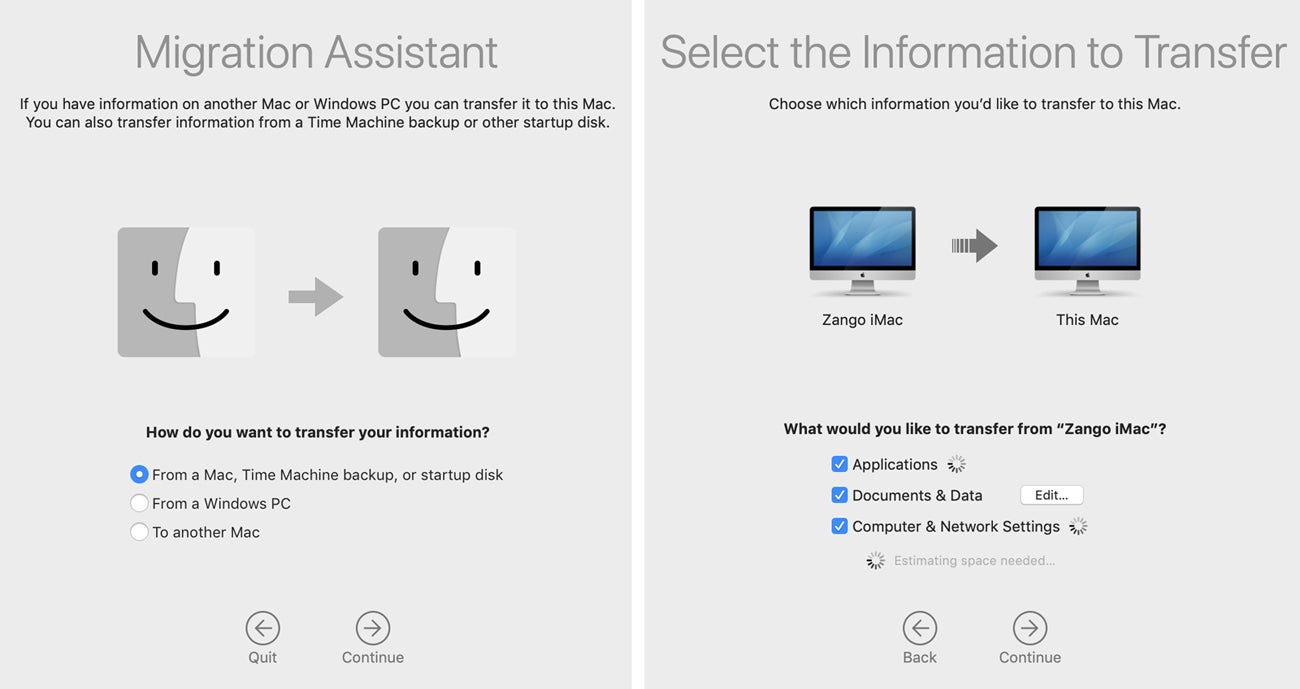
One time everything is properly connected or networked, run Migration Banana and follow the prompts to select the source for the restore/clone and what to restore/clone. Yous can as well initiate a Migration Assistant transfer to another Mac, which requires Migration Assistant to be running on that Mac. It'll accept a while to copy the selected folders and files, depending on how many there are.
 IDG
IDG Migration Banana lets you choose the source for your restore/clone (left) and the content from that source to restore/clone (right). (Click prototype to enlarge information technology.)
Note: If you intend to transfer applications from your old Mac, outset sign out of or deactivate any apps on your old Mac. Well-nigh software these days is tied to an online account that limits the number of active installations or has digital rights management to prevent piracy via copying.
Note: You must accept administrator access on your Mac to run Migration Assistant.
Transfer via a Time Machine backup
MacOS has as well long had the built-in Time Machine backup utility that lets you restore an entire Mac — applications, files, settings, and and then on. (It resides in the Applications folder.) You tin use Fourth dimension Car to essentially restore a Mac onto another Mac — it clones the Mac, basically. (Time Machine doesn't work for migrating a Windows PC to a Mac, of form.)
This is the almost thorough way to duplicate an existing Mac into another, and it'southward all-time to use it for migrating a personal Mac to a new personal Mac or an IT-managed Mac to an IT-managed Mac. Migrating a personal Mac to an It-managed i, or vice versa, risks violating security policies, software licenses, and IT management standards. A personal-to-piece of work Mac clone ways IT's management and other settings are not in identify on the work Mac, and a work-to-personal Mac clone likely means IT has control over your personal Mac is ways you may not realize or want.
Tip: You can likewise restore specific files from a Time Car backup drive onto a new Mac. Use the Migration Assistant utility, covered in the previous section, to do so.
Fourth dimension Car is the aureate standard for computer backup. To set up backup, connect an external drive to your original Mac. Connecting the fill-in drive via USB or other wired port is the fastest method, but y'all tin likewise utilize a wired or wireless network if your backup bulldoze is continued to a Time-Machine-compatible router, every bit many contempo routers are. Side by side, go to System Preferences > Fourth dimension Machine, select the fill-in drive using the Select Backup Disk push button, optionally turn on disk encryption for your fill-in drive, and check the Back up Automatically selection.
Note: Earlier you restore/clone a Mac to a new Mac, I strongly propose you first sign out of or deactivate any apps on your old Mac. Well-nigh software these days is tied to an online account that limits the number of active installations or has digital rights management to preclude piracy via copying. Even though you are cloning an existing setup, it'south possible that the piracy prevention may discover that the software is running om a new Mac and thus assume it was copied illegally.
Restoring or cloning a Mac from Time Automobile is a bit more than complicated. You lot have to employ macOS'due south Recovery mode. Commencement, shut down your new Mac, and then connect your Time Automobile fill-in drive to it. Next, plough your new Mac dorsum on, pressing and holding ⌘-R immediately. Exist a little patient until the macOS Utilities window opens. Click Restore from Time Machine Fill-in, so click Continue. In the next window, select the Time Car backup drive to restore/clone from, then click Continue.
You may get a list of available backups, since Time Machine maintains a history that lets you lot choose an earlier backup if desired, such as to restore a Mac from before it became infected with a virus or got corrupted. Select the desired backup version (if there's only one available, it is pre-selected) and click Go on. In the next window you lot will be asked what drive to restore the backup to. In this instance you lot want the startup drive for your new Mac; select it and then click Restore.
Now wait patiently for the restore, which can take an hour or longer depending on how much was stored on your original Mac. Restart your Mac when the restore is complete.
Transferring and setting up apps on your new Mac
No matter what transfer method you lot utilize, you may have apps to reinstall, depending on what IT did for you in preparing your new computer. For case, software that uses digital rights management may need to be reinstalled fifty-fifty later on it is migrated using Time Machine or Migration Assistant, because the digital rights management may recognize that the underlying computer has inverse. It is best to deactivate any software that uses digital licensing earlier transferring it, then activate the software on the new machine afterwards information technology is migrated or reinstalled.
On your new Mac, re-download the apps you lot demand and sign in equally required. You'll notice some apps on the Apple tree Mac App Store, while others you lot'll need to download from the manufacturer's website. If you're moving from Windows to macOS, some apps won't exist available for installation in macOS, but many widely used Windows business apps come in both versions, and virtually software manufacturers (but not all!) let you use the aforementioned license on either platform.
In most cases, you'll demand to gear up your applications' preferences on the new computer, so set aside the time to do that.
Transferring browser bookmarks to your new Mac
You lot also volition want to transfer your bookmarks from your erstwhile computer'south browser to your new figurer'southward browser. There are three methods: direct syncing between the same browser, syncing between macOS's Safari and certain Windows browsers, and exporting a browser's bookmark files to import into a different browser. The first two methods go on the browsers in sync, whereas the third method is a transmission approach for when you are moving to a new calculator (or browser) and won't apply the old calculator (or browser) anymore.
Chrome, Firefox, and Edge all sync bookmarks across all your devices if they are all signed into the same account. Just enable syncing in each browser on each device you use. To be clear, you can sync just to the same browser, such as from Chrome to Chrome.
Apple's Safari is not bachelor for Windows (or Android), but you can sync between Safari and a supported Windows browser (Internet Explorer, Chrome, and Firefox) if iCloud is installed in Windows and signed in to the same account equally the Mac or iOS device running Safari. Note: iCloud syncing is not bachelor for teaching users with managed Apple tree IDs.
For situations where your browser is non signed into the same account every bit your quondam calculator, the major browsers all have a facility to export and import bookmarks via files:
- Google Chrome: To export bookmarks, click the vertical three-dot icon at the meridian correct of your browser window, then select Bookmarks > Bookmark Manager from the menu that appears. Click the iii-dot icon to the right of the search bar and select Consign bookmarks. To import bookmarks, follow the same procedure only choose Import bookmarks instead of Export Bookmarks.
- Mozilla Firefox: To export bookmarks, use the keyboard shortcut ⌘-Shift-B in macOS or Ctrl-Shift-B in Windows to open the Library window, which shows all your bookmarks. Select the desired bookmark folder (or All Bookmarks), then choose the Import and Backup push (in macOS, it'due south the icon of two arrows) > Export Bookmarks to HTML. To import bookmarks, follow the same procedure only choose Import Bookmarks from HTML instead of Export Bookmarks to HTML.
- Apple Safari: To consign bookmarks from this macOS browser, choose File > Export Bookmarks. To import bookmarks, cull File > Import From > Bookmarks HTML File.
- Microsoft Border (legacy version): To consign bookmarks from this Windows 10-only browser that is pre-installed in Windows x versions prior to 20H2, click the three-dot icon to open the General window, click Import or Export to open the Import export window, scroll downwards until you see Export your favorites and reading list to an HTML file, select Favorites to export your bookmarks, then click Export to file.
- Microsoft Edge (Chromium version): In both Windows and macOS, to export bookmarks from this optionally installed Chromium-based browser that will get the Windows ten default starting with version 20H2, click the Favorites push (the star icon), then choose Manage favorites to open the Favorites window, select the desired bookmarks binder to export, click the horizontal 3-dot icon at the top right of the browser window, and choose Export favorites. To import bookmarks, follow the same process only choose Import favorites instead of Export favorites.
- Internet Explorer: To consign bookmarks from this discontinued Windows browser, click the Favorites push (star icon), cull Import and Export from its menu, select the Export to a file option, click Next >, select Favorites to consign bookmarks (and optionally Feed and Cookies to export them), click Adjacent >, cull the bookmarks folder to consign, click Next >, set the export location, and click Export.
When everything is transferred, be sure to sign out of all your accounts, such as Microsoft, Google, iCloud, iTunes, browser sync, shopping, and deject storage accounts, on the old computer. Y'all don't want to exceed whatever maximums on computers that tin be signed in, and you don't want the next owner to be able to use your accounts, specially any that may connect to credit and debit cards. You might even consider wiping/reformatting the old figurer, merely check with IT first, in case they demand to keep it every bit is for some catamenia of time for regulatory or HR policy reasons.
Further reading:
Copyright © 2020 IDG Communications, Inc.
Download Thumb Drive Folders to New Mac Osx
Posted by: riddickbounis.blogspot.com


0 Comments